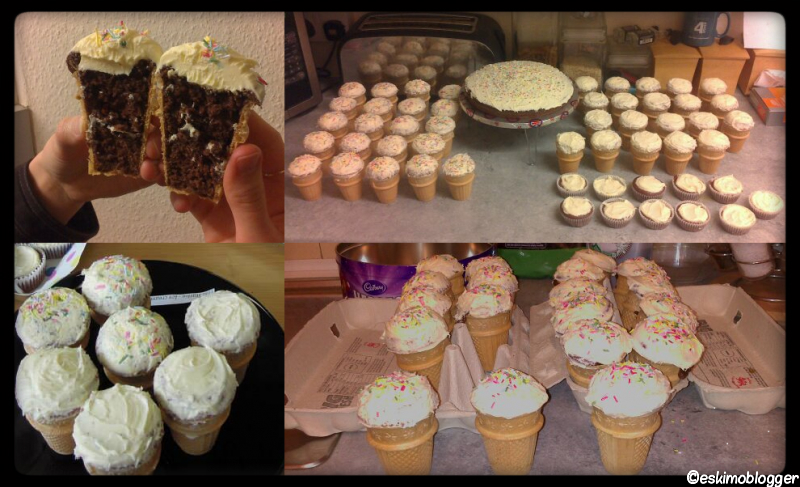
So I made these cupcakes after seeing a photo online somewhere that someone had done something similar, so decided to give them a go myself! I’ve since been inundated with requests from friends as to how I made them, as they want to make them for their kids parties… So thought I’d chuck up the easy-peasy process on here for others to enjoy also 🙂
Their REALLY easy to make, and the kids can join in too!
Now the first time I did these, I used my own chocolate cake mixture, but found they didn’t come out as well as I’d hoped, so to save time and to ensure perfect cakes, the next time I used Better Crocker mixtures and icing – and they came out sooo much better!
So to start with, you need the following ingredients:
- A packet of cake mix (I used both a Betty Crocker Milk Chocolate, and a Better Crocker Red Velvet Cake mixture for two different cakes, both came out lovely!) And any subsequent ingredients required for the mixture (oil, eggs etc.)
- One tub of Betty Crocker Vanilla Buttercream-style Icing (Or Cream-Cheese Style for the Red Velvet Cakes!)
- One pack of Askeys Ice-Cream Cones (24pk) – Make sure these are the flat-bottomed ones though!
- Tub of Hundred & Thousands Sprinkles
- Packet of standard-sized cupcake cases
- Muffin Baking Tray (to stop slipping of mixture)
Method:
- Pre-heat the oven (fan) to about 170*C
- Make up your cake mixture according to instructions
- Layout your cupcake cases into your muffin tray
- Fill each cake about 2/3 full with the cake mixture
- Place the ice-cream cone upside down into case, and twist slightly until it feels like it’s just sitting in the mixture – It should stand up by itself…
- Leave in the oven (middle-shelf) for about 17-20 minutes. Using a toothpick, stab one of the “muffins” through the top of the case to check if their done (your pick should come away clean)
- If their done, take the cones out of the oven and place the right way up onto a worktop or cooling tray for about 20 minutes
- Once cooled, GENTLY peel away the casing (or your cake will fall off!) to reveal a spongy top to your cones…
- Ensure the sponge is completely cooled, and then using a teaspoon, get a dollop of icing (about the size of a walnut) and gently place it on top of the cake, using the curve of the spoon to curve around the shape of the sponge – A bit like you would a normal ice-cream!
- You’ll probably need about 1.5-2 spoons worth of icing per cake, just make sure you don’t go crazy in the middle (top) part of the sponge as it will sink slightly and cause a large amount of sugar-overload-icing to sit in the middle of the cake…
- Lastly, decorate the cake (before the icing dries) by gently rolling the cone over a worktop or piece of kitchen-towel which has hundreds & thousands on top. This is more effective than just sprinkling them on top, as it guarantees they stay on the cone once the icing dries!
- Another idea a friend of mine tried was to stuff a chocolate flake into the top sitting just inside the sponge, just to top it off! Personally I’d worry this would unbalance the cake, but why not give it a go and give me your feedback!
- One other option ensure the cakes always stay upright (though mine never had any issues) or just for an additional surprise, would be to use a corer through the middle of the cake before icing it, and then fill it with mini smarties, M&M’s or similar, before putting the sponge back in place and icing over the top!
- Lastly, there is another way of making these, which I had mixed opinions of, some peopled loved, some preferred the way I’ve said above… BUT – Back to the part before you start baking; rather than filling the cupcake cases with mixture and then placing the cones upside-down on top, try placing the cones the right way up into the muffin tin, then pouring the mixture about 2/3 full into the cone itself… This way you’ll get cupcake right the way through the cone (like my photo), the cooking time is the same, the ONLY downside I found to this is that the sponge doesn’t rise as much out of the cone, and I personally liked the “ice-cream” part to look a bit larger and more realistic, hence cooking it the upside-down way…
This recipe should make you about 24 ice-cream cakes, plus a few extra cupcakes to spare if you use the BC mixture…
As you can see, the best way to transport these is to place them upright into an egg carton! You may need to knead around the edges of each “egg” area just to adjust for the larger base, but otherwise it’s perfect, and just wrap it in clingfilm for storage overnight!
Please give them a try and let me know how you get on! 🙂 x


One thought on “Ice-Cream Cupcake Recipe!”